Last Updated on June 5, 2026 by CU Staff
You spot a tiny dot on your laptop screen that refuses to change color no matter what’s on display. Annoying, right? The good news is that not every stubborn dot is permanent, and some can be coaxed back to life in minutes. The bad news is that a true dead pixel is usually a hardware failure you can’t fix at home. This guide walks you through how to remove dead pixels from a laptop screen, how to tell a fixable problem from a permanent one, and exactly which methods are worth your time. I’ve run these tests on my own machines and a few hand-me-down laptops, so I’ll tell you what actually moves the needle and what’s mostly wishful thinking.
Quick Answer: How to Remove Dead Pixels From a Laptop Screen
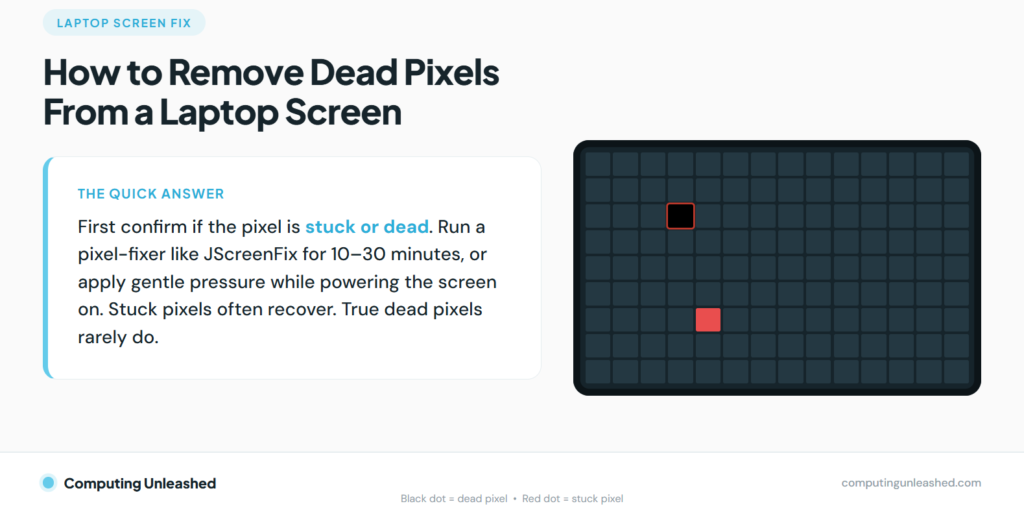
To remove dead pixels from a laptop screen, first confirm whether the pixel is stuck or dead, then run a pixel-fixing tool like JScreenFix for 10 to 30 minutes, or apply gentle pressure on the spot while powering the screen on. Stuck pixels often respond. True dead pixels rarely recover and may need a warranty claim.
What a Dead Pixel Actually Is
Your laptop screen is a grid of millions of tiny squares called pixels. Each pixel is built from three smaller parts called sub-pixels, one red, one green, and one blue. These sub-pixels combine in various intensities to create the full spectrum of colors you see on your display. When those sub-pixels work, you get every shade you’d expect. When they don’t, you get a dot that looks wrong.
A pixel goes “dead” when the transistor controlling it fails completely. A dead pixel means the entire pixel unit has failed and no sub-pixels receive power, which is a hardware failure at the transistor level. Think of it like a blown fuse. No signal gets through, so the spot stays dark regardless of what the screen is supposed to show. That’s why dead pixels are the hard ones. There’s no command you can send to fix a part that isn’t receiving power.
Knowing this matters because it sets your expectations. If you’re dealing with a genuine dead pixel, the home fixes below have a low success rate. If it’s a stuck pixel (more on that next), your odds are much better.
Dead Pixel vs Stuck Pixel: Know Which One You Have
People use these terms as if they mean the same thing, but they don’t, and the difference decides whether you can fix it.
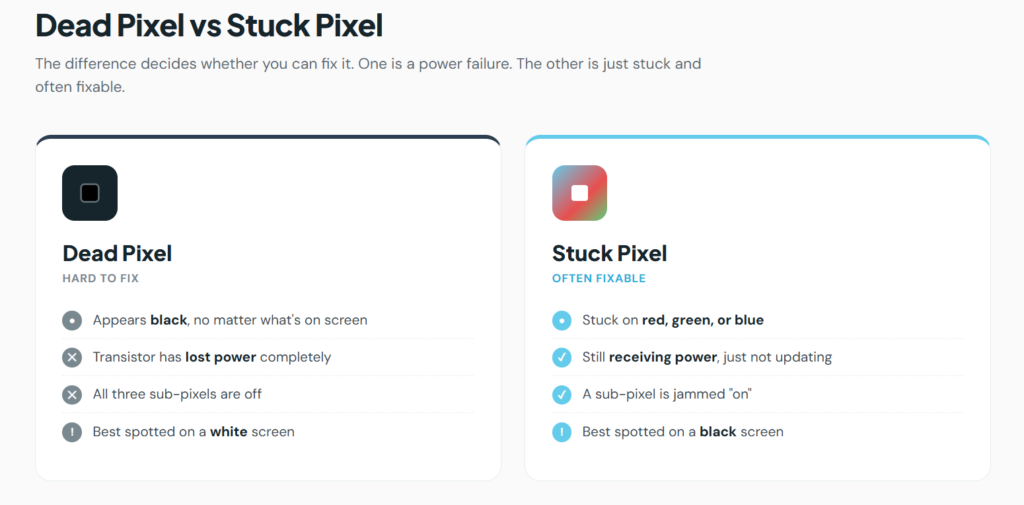
A dead pixel shows up as a black dot. It doesn’t light up at all and stays black regardless of screen content because all sub-pixels are off. The easiest way to spot one is to fill your screen with solid white. A black speck that won’t wipe away is your suspect.
A stuck pixel is different. A stuck pixel appears in red, green, or blue depending on its functionality and brightness, while a dead pixel appears black because all subpixels are permanently off. A stuck pixel is still getting power. These pixels are receiving power, they’re just not responding to color change commands from the display controller, like a light switch jammed in the on position. Because the hardware still works, a stuck pixel can often be nudged back to normal.
Here’s the simplest way to test:
- Show a solid white screen to hunt for dark dead pixels.
- Show a solid black screen to hunt for bright stuck pixels.
- Then cycle through red, green, and blue to expose sub-pixel faults that hide on white.
A true black dead pixel is rarely fixable, while a stuck sub-pixel sometimes responds to controlled color cycling. One quick reality check from the pros: if your pixel appears colored, whether white, red, green, or blue, it’s likely a stuck pixel. That’s the one you want, because that’s the one you can probably fix.
Run a Dead Pixel Test Before You Try Anything
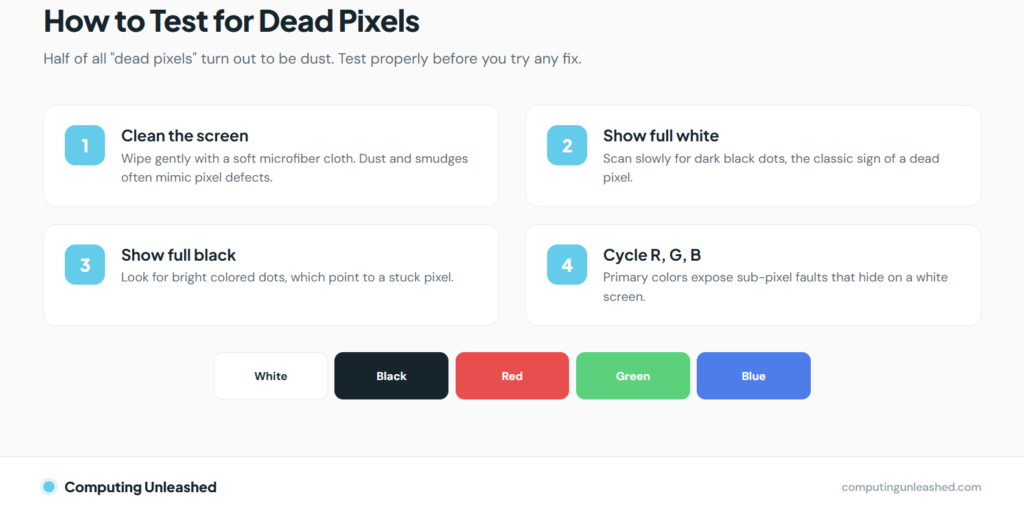
Don’t skip this step. Half the “dead pixels” people panic over are dust or smudges.
Clean the screen first with a soft microfiber cloth, since dust, lint, dried cleaner, and tiny debris can mimic pixel defects, especially on glossy portable screens and high-density laptop panels. A clean wipe solves more “pixel problems” than any software. If you’ve never cleaned a laptop display properly, our walkthrough on keeping a touch screen laptop spotless covers the safe way to do it without scratching the panel.
Once the screen is clean, run the actual test:
- Open a full-screen dead pixel test (plenty of free web-based ones exist, or use a solid-color image).
- Switch to full white and scan slowly for black dots.
- Switch to full black and scan for bright colored dots.
- Cycle red, green, blue, and watch for any pixel that stays the wrong color.
Use full-screen mode and keep your inspection pace slow. Note where each defect sits and what color it is. A pixel that looks fine on white but turns black on a red screen, for example, points to a single dead red sub-pixel rather than a fully dead pixel.
Why location matters as much as count
A single dead pixel dead-center on your screen is far more irritating than three clustered in a corner you never look at. It also affects whether a manufacturer will replace the panel. The defect count matters, but location matters just as much, and in practice manufacturers and retailers may tolerate a small number of pixel anomalies, often with different thresholds for dark, bright, and clustered defects. Keep that in mind before you decide a fix is worth the effort or a warranty claim is worth the hassle.
Method 1: Fix Stuck Pixels With Software
This is the first thing to try because it’s free, it’s safe, and it works on the most common problem. The idea is simple: rapidly flashing colors over a stuck sub-pixel can shake it loose and get it responding again.
The most popular tool is JScreenFix, a free web app. It repairs stuck pixels using the JScreenFix algorithm, works on LCD and OLED screens, and runs through HTML5 and JavaScript in your browser with nothing to install. That browser-based approach is handy on a laptop because you don’t have to download or trust an executable.
Here’s how to use it:
- Open the JScreenFix page on the laptop with the problem.
- Launch the pixel fixer. A box of fast-flashing static appears.
- Drag the pixel fixer over the stuck pixel and leave it running for at least 10 minutes.
- If nothing changes, run it longer or repeat. Letting it sit for half an hour does no harm.
In my experience, when a stuck pixel is going to respond, it usually does within the first 15 to 20 minutes. If you’ve run it twice with no change, software probably isn’t going to win this one.
A quick warning: these tools flash colors very fast. If you’re sensitive to flashing images, look away from the box while it runs.
Method 2: The Pressure (Tap) Method
If software didn’t do it, a careful physical nudge sometimes works on a stuck pixel. The theory is that gentle pressure can realign the liquid crystal in that spot. This carries a small risk, so go light. Too much force creates more dead pixels than it fixes.
Do it like this:
- Power off the laptop and turn the screen off.
- Find a soft, slightly damp microfiber cloth (damp, not wet) to avoid scratching.
- Place the cloth over the exact spot and apply very light pressure with a fingertip or a blunt, soft-tipped object.
- While keeping that gentle pressure, turn the laptop and screen back on.
- Release after a few seconds and check the pixel.
Press only on the single problem area, never the whole panel, and never hard enough to see ripples spreading across the display. If you see the screen distorting under your finger, you’re pushing way too hard. Stop.
Method 3: The Power-Off Rest
Sometimes the laziest fix works. Stuck pixels, especially on phones and some laptop panels, occasionally reset themselves after the screen has been completely off for a long stretch. Power the laptop down fully, leave it off overnight, and check again in the morning. It’s not a strong fix, but it costs you nothing and it’s worth trying alongside the methods above.
When You Can’t Fix It: Dealing With a True Dead Pixel
Let’s be honest about the limits. A dead pixel is a dead transistor, and you can’t software your way around hardware that’s lost power. So if you’ve cleaned the screen, confirmed the dot is black on white, run a fixer with no luck, and tried gentle pressure, you’re likely looking at a permanent defect.
At that point your realistic options are:
- Check your warranty. Many laptops are covered for pixel defects, though the threshold varies by brand. Stuck pixels are generally treated the same as dead pixels for warranty purposes, and bright-pixel policies typically cover stuck pixels.
- Contact the retailer. If the laptop is new, a dead pixel out of the box is often grounds for a return or exchange.
- Live with it. One off-center pixel is genuinely easy to stop noticing after a week. Your brain filters it out.
- Replace the panel. Possible, but laptop screen replacements often cost enough that it only makes sense on a newer or high-end machine.
There’s no shame in just leaving it alone. A lone dead pixel doesn’t spread or damage the rest of the screen, and chasing it harder usually isn’t worth the risk to a working display.
Common Mistakes to Avoid With Dead Pixels
- Pressing too hard. The single biggest way people make things worse. Heavy pressure can kill more pixels or crack the panel.
- Skipping the cleaning step. You might spend an hour “fixing” a smudge that a microfiber wipe would have cleared in five seconds.
- Assuming every colored dot is dead. Colored usually means stuck, which means fixable. Don’t write it off.
- Using sharp or hard objects on the screen. Pens, fingernails, and rigid tools scratch coatings and damage the panel. Soft cloth only.
- Expecting software to fix a true dead pixel. Pixel fixers target stuck pixels. A black dead pixel almost never responds, and that’s normal.
Pro Tips and Best Practices
- Test new laptops immediately. Run a full pixel check within your return window so a defect is the seller’s problem, not yours.
- Try the easy fixes first, in order. Clean, then software, then a careful pressure nudge. Don’t jump straight to pressing on the screen.
- Give software time. A fixer that fails in two minutes might succeed in twenty. Patience beats force here.
- Document defects. Photos of the pixel with date stamps help if you need to file a warranty claim later.
- Mind your screen’s health overall. Heat and rough handling shorten a panel’s life. If you’re curious how long your machine should realistically last, our piece on how long a laptop should last puts display wear in context.
Key Takeaways
If there’s one thing to remember, it’s this: figure out whether you have a stuck pixel or a dead pixel before you do anything else. Stuck pixels (the colored ones) often respond to a free software fixer or a gentle pressure nudge. True dead pixels (the black ones) are a hardware failure and usually won’t recover, so your best move there is a warranty claim or simply learning to ignore it. Always clean the screen first, always try the gentlest method before the riskier one, and never press hard enough to risk the rest of your display.
Frequently Asked Questions
Can a dead pixel on a laptop be fixed permanently?
Usually not. A true dead pixel is a hardware failure where the controlling transistor no longer receives power, so no software or pressure trick can restore it. Stuck pixels, which appear as a fixed color rather than black, are the ones that can often be fixed permanently with a pixel-fixing tool or a gentle nudge.
How do I tell if my pixel is stuck or dead?
Display a solid white screen to spot dark dead pixels and a solid black screen to spot bright stuck pixels. A black dot that won’t change is likely dead, while a dot stuck on red, green, or blue is likely a stuck pixel and is far more likely to be fixable.
Does JScreenFix actually work on laptops?
It can, for stuck pixels. JScreenFix runs in your browser and flashes rapid colors over the affected area to coax a stuck sub-pixel back to normal. Leave it running for at least 10 minutes, and longer if needed. It rarely helps a true black dead pixel, since those are a hardware fault.
Is it safe to press on my laptop screen to fix a pixel?
It can be safe if you’re extremely gentle and press only on the single problem spot with a soft cloth. Too much pressure can create new dead pixels or crack the panel. If you see ripples spreading across the display, you’re pressing far too hard and should stop.
Will a dead pixel spread or damage my screen?
No. A single dead pixel stays put and does not spread to neighboring pixels or harm the rest of the display. It’s a localized fault, which is why many people simply choose to ignore one if it sits away from the center of the screen.
Should I return a new laptop because of one dead pixel?
If the laptop is still within its return or warranty window, a dead pixel out of the box is often grounds for an exchange, though thresholds vary by manufacturer. Test any new laptop right away with white, black, and primary-color screens so you can catch defects while you still have the option to return it.