Last Updated on May 21, 2026 by CU Staff
Taking a screenshot on a Dell laptop is one of those everyday skills that saves you constantly: capturing an error message, saving a receipt, or grabbing something from a video call before it scrolls away. The best part is that you do not need any extra software. Windows already includes every tool you need, and the same shortcuts work across almost every Dell model, from a budget Inspiron to a high-end Alienware. Below I walk through each method I actually use, when each one makes sense, and how to fix the small problems that trip people up on Dell keyboards.
For context, I have set up and tested screenshots on dozens of Windows laptops over the years, several of them Dells, so these steps come from real use rather than a spec sheet.
Quick Answer: How to Screenshot on a Dell Laptop
To take a screenshot on a Dell laptop, press the Windows key plus Print Screen to save the whole screen as an image, or press Windows + Shift + S to capture just the part you want. Both methods are built into Windows and work on any Dell model.
Dell Screenshot Methods at a Glance
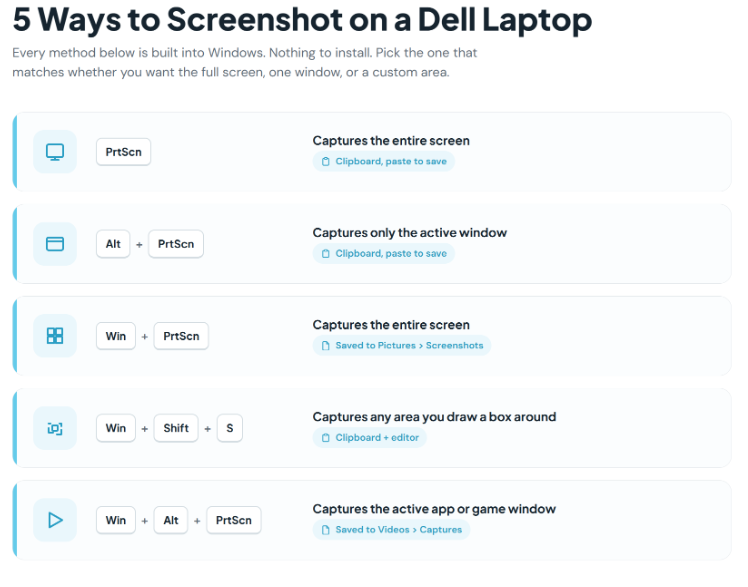
Before the step-by-step instructions, here is the short version. Every method below is built into Windows, so nothing needs installing. The right one depends on whether you want the full screen, one window, or a custom slice, and whether you want it saved automatically or copied to your clipboard.
| Shortcut | What it captures | Where it ends up |
|---|---|---|
| Print Screen (PrtScn) | The entire screen | Clipboard (paste to save) |
| Alt + Print Screen | Only the active window | Clipboard (paste to save) |
| Windows + Print Screen | The entire screen | Pictures > Screenshots (saved automatically) |
| Windows + Shift + S | Any area you draw a box around | Clipboard, plus the Snipping Tool editor |
| Windows + Alt + Print Screen | The active app or game window | Videos > Captures (saved automatically) |
A quick note before we start. Knowing how to capture and share your screen cleanly is a genuinely useful habit, the kind of small computing skill that pays off in school, at work, and when you are troubleshooting a problem over chat with someone who cannot see your screen.
Capture the Whole Screen With the Print Screen Key
The Print Screen key is the original screenshot method, and it still works fine on a Dell. Find the key in the top row of your keyboard. On most Dell laptops it is labeled PrtScn or PrtSc, usually near the top right.
Press it once. Nothing visible happens, and that throws a lot of people off, but the image is now sitting on your clipboard. To turn it into an actual file, open an app that accepts pasted images (Paint is the easiest), press Ctrl + V to paste, then save it as a PNG or JPG.
So the full flow looks like this:
- Get the screen looking exactly how you want it.
- Press PrtScn.
- Open Paint, Word, or your image editor of choice.
- Press Ctrl + V to paste.
- Save the file.
It is a couple of extra steps compared to the newer methods, but it is reliable and it works everywhere.
Show Image
Screenshot Just the Active Window (Alt + Print Screen)
Sometimes you do not want the whole desktop. You want one window, cleanly, without the taskbar and everything else cluttering the shot. That is what Alt + Print Screen is for.
Click the window you want first so it is active, then hold Alt and tap PrtScn. Only that window goes to your clipboard. Paste it into Paint or any document with Ctrl + V and save. I reach for this one constantly when I am writing instructions for someone and only want them to see a single dialog box, not my messy second monitor.
Save a Screenshot Straight to a File (Windows + Print Screen)
This is the method I use most, and honestly the one most people should start with. Press the Windows key + Print Screen together. Your screen dims for a split second, which is the confirmation that it worked.
The difference here is that Windows skips the clipboard step entirely. It saves a PNG file automatically to your Pictures folder, inside a subfolder called Screenshots. No pasting, no Paint, no saving. The file is just there waiting for you. If you take a lot of screenshots and keep forgetting to paste and save them, this shortcut fixes that habit overnight.
How Do You Screenshot Exactly What You Want With the Snipping Tool?
For anything where you need to grab a precise area, the Snipping Tool is the best tool on a Dell laptop, and it is what I default to for tutorials. Press Windows + Shift + S and the screen dims with a small toolbar at the top.
You get a few capture modes to choose from:
- Rectangle: Drag a box around exactly the area you want. This is the one you will use most.
- Window: Click any open window to grab it cleanly.
- Full screen: Captures everything at once.
- Freeform: Draw any shape you like around the area.
Once you let go, the snip copies to your clipboard, and a notification pops up in the corner. Click that notification to open the snip in the Snipping Tool editor, where you can crop it, mark it up with a pen or highlighter, and then save or share it. On Windows 11, the tool also saves a copy to your Screenshots folder automatically. Microsoft has a full breakdown of the Snipping Tool’s capture and annotation features in its official Snipping Tool guide if you want to dig into the editing side.
What If Your Dell Has No Print Screen Key?
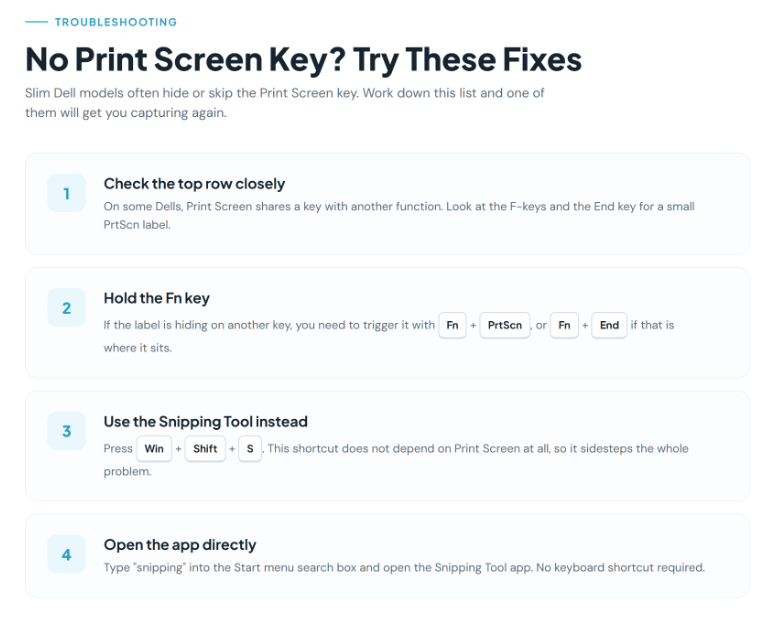
This catches a lot of people, especially on slimmer Dell models with compact keyboards. If you cannot find a Print Screen key, you have a few options.
First, look closely at the top row. On some Dell keyboards, Print Screen shares a key with another function (it can sit on the End key or one of the F-keys) and you need to hold the Fn key to trigger it. So try Fn + PrtScn, or Fn + End if that is where the label is hiding.
If there is genuinely no Print Screen function at all, just use Windows + Shift + S instead. The Snipping Tool shortcut does not depend on the Print Screen key, so it sidesteps the whole problem. You can also open the Snipping Tool app directly by typing “snipping” into the Start menu search box. Dell’s own support article on the Print Screen key lists the model-specific key layouts if yours is unusual.
How to Screenshot on a Dell 2-in-1 or Tablet
If you own a Dell 2-in-1 or you are using your laptop in tablet mode with the keyboard folded back, the keyboard shortcuts are awkward to reach. Windows has a hardware shortcut for exactly this: press the Windows button + Volume Down at the same time. The screen dims briefly and the shot saves straight to your Screenshots folder, the same as the Windows + Print Screen method.
One small thing worth mentioning here. On touchscreen Dell models, fingerprints and smudges show up clearly in your captures, which is annoying when you are trying to share a clean image. It only takes a minute to clean a touch screen laptop properly, and it makes a noticeable difference in your screenshots.
Screenshot Your Gameplay With Xbox Game Bar
If you have a Dell gaming laptop (a G-series or an Alienware), there is a method built for capturing games and full-screen apps where the normal shortcuts sometimes misbehave. Press Windows + G to open the Xbox Game Bar, then click the camera icon to grab a still. Even faster, Windows + Alt + Print Screen snaps the active game window instantly.
These captures save to a different spot than the others: look in your Videos folder, inside a subfolder called Captures. Worth knowing, because people often go hunting in the Screenshots folder and panic when their game shots are not there.
Where Does a Dell Laptop Save Your Screenshots?
This is the question I get asked most, so let me be specific. The save location depends entirely on which method you used:
- Windows + Print Screen and Windows button + Volume Down: saved to Pictures > Screenshots.
- Xbox Game Bar captures: saved to Videos > Captures.
- Print Screen, Alt + Print Screen, and Windows + Shift + S: copied to your clipboard, so you have to paste and save them yourself (the Snipping Tool also auto-saves to Screenshots on Windows 11).
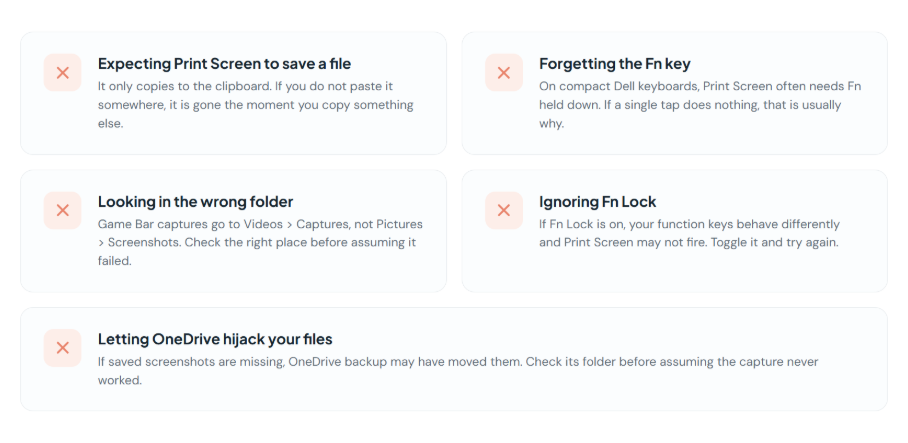
If you use OneDrive and your screenshots seem to vanish, check OneDrive’s settings. It sometimes takes over screenshot backup and reroutes your files into a OneDrive folder instead of the local Pictures folder.
Show Image
Editing and Resizing Your Screenshot
A raw screenshot is rarely the final product. Most of the time you want to crop out the parts that do not matter and maybe highlight the bit that does. The Snipping Tool editor handles basic cropping, pen marks, and highlighting, which covers about ninety percent of what people need. Paint works too if you want to add text or arrows.
If you need to scale a small screenshot up for a presentation or a print, be careful, because blowing up a low-resolution image usually turns it into a blurry mess. There are better ways to enlarge an image without losing quality than just dragging the corner bigger. And if you are collecting several screenshots into a single document to send to someone, it is often cleaner to drop them into a PDF. A few free tools to edit PDF files online let you combine and annotate them without paying for anything.
Common Mistakes to Avoid When Taking a Screenshot on a Dell Laptop
A few small things trip people up over and over. Watch for these:
- Expecting Print Screen to save a file. It only copies to the clipboard. If you do not paste it somewhere, it is gone the moment you copy something else.
- Forgetting the Fn key. On compact Dell keyboards, Print Screen often needs Fn held down. If a single tap does nothing, that is usually why.
- Looking in the wrong folder. Game Bar captures go to Videos > Captures, not Pictures > Screenshots. Check the right place before assuming the shortcut failed.
- Ignoring Fn Lock. If Fn Lock is on, your function keys behave differently and Print Screen may not fire as expected. Toggle it and try again.
- Letting OneDrive hijack your files. If saved screenshots are missing, OneDrive backup may have moved them. Check its folder.
Pro Tips for Faster Screenshots on a Dell Laptop
A handful of habits that make this genuinely quick once they stick:
- Memorize one shortcut, not five. For most people, Windows + Shift + S is the single best option because it works on any Dell, captures any region, and lets you edit right away.
- Use the timed snip for menus. The Snipping Tool has a Delay option. Set it to a few seconds so you can open a dropdown or right-click menu before the capture fires, since those normally vanish the second you click away.
- Remap Print Screen to open the Snipping Tool. In Settings > Accessibility > Keyboard, you can make the Print Screen key launch the Snipping Tool directly. It turns one key into your fastest capture button.
- Update your keyboard driver if shortcuts stop working. A stale driver can break Print Screen on a Dell. Windows Update or Dell’s support site sorts it out.
Key Takeaways
You have plenty of ways to take a screenshot on a Dell laptop, and you do not need to learn all of them. If you remember just one, make it Windows + Shift + S, because it works on every Dell, captures exactly what you want, and lets you crop and mark up the image immediately. For instant full-screen saves, Windows + Print Screen drops a file straight into your Pictures > Screenshots folder. Everything else is a useful backup for specific situations like gaming, tablet mode, or a keyboard with no Print Screen key.
Frequently Asked Questions
How do I take a screenshot on a Dell laptop without the Print Screen key?
Press Windows + Shift + S to open the Snipping Tool, which does not rely on the Print Screen key at all. You can also open the Snipping Tool app by typing “snipping” in the Start menu search box. On compact Dell keyboards, try Fn + PrtScn in case the key is sharing a function.
Where are my screenshots saved on a Dell laptop?
It depends on the method. Windows + Print Screen saves files to Pictures > Screenshots automatically. Xbox Game Bar captures go to Videos > Captures. The plain Print Screen, Alt + Print Screen, and Windows + Shift + S shortcuts copy to your clipboard, so you have to paste and save them yourself.
Why is my Print Screen key not working on my Dell laptop?
The most common cause is the Fn key. On many Dell laptops you need to press Fn + Print Screen rather than the key on its own. Check whether Fn Lock is toggled on, and make sure no other app is overriding the shortcut. If it still fails, use Windows + Shift + S instead and update your keyboard driver.
How do I screenshot only part of the screen on a Dell laptop?
Press Windows + Shift + S, then choose the rectangle or freeform mode from the small toolbar that appears. Drag a box around the area you want. The selection copies to your clipboard, and clicking the pop-up notification opens it in the editor so you can crop and save it.
Can I take a screenshot on a Dell laptop in tablet mode?
Yes. On a Dell 2-in-1 or tablet, press the Windows button and the Volume Down button at the same time. The screen dims for a moment to confirm the capture, and the image saves automatically to your Pictures > Screenshots folder.
What is the fastest way to screenshot on a Dell laptop?
For most people, Windows + Shift + S is the fastest all-around method because it captures any region and opens straight into an editor. If you only ever need the full screen saved as a file, Windows + Print Screen is even quicker since it skips the clipboard and saves automatically.
How do I screenshot a single window on a Dell laptop?
Click the window you want so it becomes active, then press Alt + Print Screen. Only that window is copied to your clipboard. Paste it into Paint or a document with Ctrl + V and save. You can also use the Snipping Tool’s Window mode for the same result with built-in editing.